Introduction
Once a bowling ball exits the oil, the most important part of ball motion begins.
In the previous article, we focused on where a bowling ball should exit the oil and why that exit point matters. Once the ball leaves the pattern at the correct board and distance, the next question becomes just as critical:
What does the ball actually do down lane?
This is where bowling ball motion down lane comes into play. After the ball exits the oil, the reaction is no longer about location — it’s about movement. Two shots can leave the oil in nearly the same place and still produce completely different shapes based on how the ball transitions, how much energy it stores, and how it enters the roll phase.
Backend motion isn’t random, and it isn’t just about “hooking more.” It’s the result of several factors working together, including energy retention, the timing of the hook-to-roll transition, and how well the ball design and release match the lane conditions.
When these elements line up, ball motion looks smooth, predictable, and powerful. When they don’t, even well-thrown shots can feel inconsistent.
In this article, we’ll break down what actually happens during bowling ball motion down lane, focusing on the hook phase, roll phase, and how equipment and release choices shape what you see on the backend.
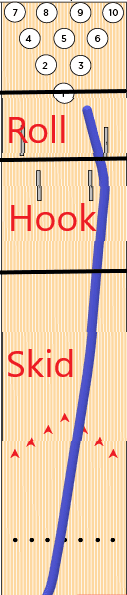
The Hook Phase: What Happens After the Ball Finds Friction
Once the ball exits the oil and touches friction, it enters the hook phase. This is the part of bowling ball motion down lane where the ball is no longer just traveling — it’s actively responding to the lane.
Simply put, the hook phase is when:
- The ball begins to gain traction
- Axis rotation starts to decrease
- The ball changes direction toward the pocket
This doesn’t happen all at once. It’s a gradual transition as the ball picks up more friction and starts to use its stored energy.
Why the Hook Phase Matters More Than “How Much Hook”
Many bowlers judge a shot by how many boards the ball covers, but that’s often the wrong metric. What really matters is:
- When the ball starts hooking
- How fast it transitions
- What shape it creates downlane
Two balls can hook the same total number of boards and produce completely different results. One might hook early and roll out, while the other hooks later with better continuation and carry.
This is why timing and shape are far more important than raw hook potential. A ball that hooks “less” but does it at the right time will almost always score better than a ball that hooks a lot but transitions too early or too late.
Understanding the hook phase helps you stop chasing hook and start chasing better ball motion down lane — motion that matches the lane and delivers energy to the pins more effectively.
What Controls the Strength and Length of the Hook Phase
The hook phase doesn’t happen by accident. The strength, length, and shape of bowling ball motion down lane are largely controlled by the ball’s design. Three core factors determine how the hook phase behaves: coverstock strength, RG, and differential.
Understanding what each one actually does — and what it doesn’t do — makes ball selection and layout choices far more intentional.
A. Coverstock Strength
Coverstock is the primary driver of how soon the ball reacts to friction.
Stronger coverstocks:
- Grab the lane sooner
- Create a longer, smoother hook phase
- Use more energy earlier in the lane
These are useful when there’s more oil or when you need the ball to read the lane earlier and blend out over/under reaction.
Weaker coverstocks:
- Push farther down the lane
- Create a shorter, quicker hook phase
- Store energy for later
Weaker covers are effective when lanes are drier or when you need the ball to clear the front and respond more sharply downlane.
B. RG (Radius of Gyration)
RG influences how quickly the ball revs up, which directly affects when the hook phase begins.
Low RG balls:
- Spin up faster
- Start hooking earlier
- Are useful when you need earlier lane read and control
High RG balls:
- Save energy longer
- Start hooking later
- Are useful when you need backend motion and continuation
RG doesn’t change how much the ball hooks — it changes when that hook begins.
C. Differential
Differential controls how fast the ball transitions from skid to hook and eventually into roll.
- Higher differential
- Faster transition
- Stronger flare
- More defined hook phase
- Lower differential
- Slower transition
- Smoother shape
- More controlled motion
Important distinction:
Differential affects the rate of transition, not the total amount of hook. Two balls can hook the same number of boards, but the one with higher differential will get there faster and more aggressively.
When these three factors work together correctly, the hook phase becomes predictable — and predictable motion down lane is what leads to better entry angles and more consistent carry.
Energy Storage vs Early Roll
When people talk about “backend,” they’re really talking about energy management.
In simple terms, energy storage is how much rotation, speed, and direction change the ball still has left after it exits the oil and goes through the hook phase.
The goal isn’t maximum hook — it’s having the right amount of energy at the pins.
What Happens When Energy Is Spent Too Early
If a ball uses up too much energy early in the lane:
- It starts rolling forward too soon
- The hook phase blends out or disappears
- The ball enters the pins with less continuation
This usually shows up as:
- Flat hits
- Weak 10-pins or 7-pins
- A “dead” look through the pin deck
The ball technically hooks, but it’s already rolling before it reaches the ideal entry point.
What Happens When Energy Is Saved Too Long
If a ball stores too much energy and doesn’t slow down enough before the pins:
- It skids too far past the breakpoint
- The roll phase happens too late (or not at all)
- The ball drives through the pins too hard
This often results in:
- Heavier hits
- Weird pin leaves and crazy splits (4-6-7-8-10 for example)
- Inconsistent carry even on good shots
The ball looks sharp, but the timing of the motion is off.
Why Energy Timing Controls Carry
Great pin carry happens when:
- The ball is still hooking slightly as it enters the pocket
- It transitions into roll just after impact
- Energy is released through the pins, not before them
Matching energy storage to the lane condition is what separates a ball that “hooks a lot” from one that actually scores.
And that timing — when the ball stops hooking and starts rolling — leads directly into the next critical phase: the roll phase.
The Roll Phase: Where the Ball Actually Hits the Pins
The roll phase is the final phase of ball motion — and it’s the phase that actually determines how the ball goes through the pins.
Simply put:
The roll phase is when the ball stops hooking and begins rolling forward end-over-end.
At this point, the ball is no longer changing direction. It’s driving straight through the pocket with whatever energy and angle it has left.
Why the Roll Phase Is So Misunderstood
Most bowlers focus on:
- How early the ball hooks
- How sharp the backend looks
- How many boards the ball covers
But none of that matters if the ball enters the roll phase at the wrong time.
A ball can look great downlane and still hit poorly if:
- It rolls too early
- Or it doesn’t roll early enough
Because the pins don’t care how much the ball hooked — only how it rolls through them.
What Good Roll Actually Looks Like
When the roll phase is timed correctly:
- The ball is still slightly hooking at the pocket
- Forward roll takes over right at impact
- Deflection is reduced
- The ball continues through the 8–9 area
This is where you see:
- Strong pocket hits
- Pins staying low
- Fewer weak corners
The roll phase isn’t about motion on the lane — it’s about motion through the pin deck.
And understanding when your ball enters this phase is the key to choosing the right ball, surface, and layout for the condition.
Matching the Roll Phase to Entry Angle
This is where bowling ball motion down lane directly turns into carry — or lost pins.
You can have the “right” line, the “right” ball, and even the “right” breakpoint, but if the roll phase doesn’t match the entry angle, carry will be inconsistent at best.
What an Ideal Roll Phase Looks Like
At optimal impact:
- The ball is just finishing its hook
- Forward roll is taking over right before contact
- Axis rotation is low, but not zero
- The ball is driving through the pins, not deflecting sideways
This timing allows the ball to:
- Enter the pocket at the proper angle
- Transfer energy efficiently
- Keep pins low and in play
This is the sweet spot for consistent carry.
What Happens When the Ball Rolls Too Early
When the roll phase starts too far up the lane:
- The ball has already used most of its energy
- Entry angle decreases
- The ball loses continuation through the pocket
The result is familiar:
- Flat 10s (right-handers)
- Weak 7s (left-handers)
- Hits that feel “solid” but don’t carry
The ball isn’t missing the pocket — it’s missing the energy timing.
What Happens When the Ball Rolls Too Late
When the ball is still hooking at impact:
- Axis rotation is too high
- The ball doesn’t deflect off of any pins
- Energy is being spent sideways, not forward
This leads to:
- Too strong of pocket hits
- Splits and weird leaves
The ball looks angular, but the hit doesn’t let pins actually hit other pins and you still end up getting zero carry
Why This Controls Carry Consistency
Carry isn’t random. It’s a result of:
- Proper entry angle
- Proper roll timing
- Proper energy transfer
When the roll phase matches the entry angle:
- Misses carry better
- Light hits mix
- Flush hits don’t quit
This is why high-level bowlers obsess over roll timing, not just hook shape.
Get the roll phase right, and the pins take care of themselves.
Common Ball Motion Shapes and What They’re For
Not all good shots look the same. Different lane conditions — and different bowlers — require different ball motion shapes down lane. The key is knowing what each shape is designed to do and when it helps or hurts you.
A. Continuous Motion
A continuous ball motion features:
- A long hook phase
- A smooth, rounded transition into the roll phase
- Strong continuation through the pins
This type of motion doesn’t jerk off the spot or snap violently. Instead, it keeps hooking gradually as it approaches the pocket.
Best used for:
- Blending wet/dry conditions
- Controlling over/under reactions
- Sport or flatter patterns where predictability matters
Continuous motion is often what coaches mean when they say, “That ball just rolls really good.”
B. Angular Motion
Angular motion is defined by:
- A shorter hook phase
- A faster transition once friction is found
- More visible backend “pop”
This is the shape most bowlers think of when they picture backend hook.
Best used for:
- Creating angle through the pins
- Opening up the lane
- Situations where you need the ball to corner harder downlane
Angular motion can carry very well — but it’s also more sensitive to misses if the timing isn’t right.
C. Smooth / Forward Roll Motion
A smooth or forward roll shape features:
- An earlier read of the lane
- A short backend reaction
- Less change of direction downlane
This shape looks calm and controlled, even when the lanes are challenging.
Best used for:
- Tough or high-friction patterns
- Short patterns where backend is unpredictable
- Situations where controlling the pocket matters more than entry angle
Smooth, forward-rolling shapes may not look exciting, but they often score extremely well when conditions demand control.
Understanding these shapes helps you stop asking, “Does this ball hook enough?”
and start asking, “Is this the right motion for what the lane is giving me?”
How Layouts Influence Hook → Roll Transitions
Layouts don’t magically create ball motion — they fine-tune how a ball transitions from hook to roll. Think of layouts as the final adjustment once the correct ball and surface are already in play.
They influence how the ball uses its energy, not whether it has it.
Pin Placement and the Length of the Hook Phase
Pin position plays a major role in how long the hook phase lasts.
In general:
- Certain pin placements allow the ball to rev up sooner, creating an earlier and smoother hook phase
- Others delay that process, helping the ball store energy and hook later
This affects:
- How quickly the ball transitions off friction
- Whether the backend motion looks smooth or quick
- How early the ball enters the roll phase
Pin placement isn’t about more or less hook — it’s about when the hook happens.
VAL Angles and Response Time
VAL angles primarily influence how fast the ball responds once it finds friction.
- Smaller VAL angles = quicker response, faster transition
- Larger VAL angles = slower response, smoother motion
This directly impacts:
- Backend shape
- Miss room left or right
- How controllable the ball feels downlane
VAL adjustments are especially useful when two balls hook the same amount but look very different on the backend.
An Important Reality Check on Layouts
Layouts are powerful — but they are not a substitute for proper ball selection or surface.
A layout:
- Can’t make a weak ball act strong
- Can’t fix a ball that exits the oil in the wrong place
- Can’t overcome a poor surface match
The best way to think about layouts is this:
Ball choice sets the motion. Surface sets the timing. Layout fine-tunes the shape.
When those three are working together, the hook-to-roll transition becomes predictable, repeatable, and score-friendly.
For more info on Layouts, check my post about them: Choosing the Right Bowling Ball Layout
Putting It All Together
When you zoom out, bowling ball motion down lane follows a simple — but often misunderstood — sequence:
- The exit point determines where the ball begins to transition
- The hook phase defines how the ball changes direction
- The roll phase determines how the ball goes through the pins
If any one of those happens at the wrong time, carry suffers.
Great ball motion isn’t about creating the most hook or the sharpest backend. It’s about timing energy correctly so the ball is still driving when it reaches the pocket.
When timing is right:
- The shape is predictable
- Misses carry better
- Pocket hits stay strong
That’s real consistency — not just good shots here and there.
Conclusion
Understanding ball motion is what separates intentional adjustments from guessing.
Instead of changing balls randomly or chasing reaction, you can start diagnosing:
- Is my ball exiting the oil in the right place?
- Is it hooking at the right time?
- Is it rolling forward when it hits the pins?
Once you understand how the ball hooks and rolls after exiting the oil, the next step is learning how to match that motion to the correct entry angle — which is where carry is truly decided.
That’s where we’ll go next.